


Starting Bromeliads from Seed
Author: Celeste Booth6 Comments
Starting a bromeliad from seed is not the most common form of bromeliad propagation. Bromeliads are very easily propagated from the pups or offshoots the mother plant creates. Bromeliads copy themselves before they die and the pups can be easily removed and planted on their own. However, bromeliads can also be started from seed if you want to grow a number of bromeliads at the same time or just want the challenge of trying something new.
Collecting Seed

-Bromeliad seed pods
To start a bromeliad from seed, you must first collect the seed. Only a very few bromeliads self pollinate. The rest depend on birds and insects to spread pollen. If you grow bromeliads indoors, you will need to pollinate the flowers yourself. If your bromeliads are primarily grown outdoors, it is likely that they will have been pollinated and can produce viable seeds. Once the seed pod develops it is ready it will come off of the plant easily with a slight pull. There are many seeds inside of a single seed pod. To remove the jelly like substance that typically covers the seeds you can soak them in a container with a drop of detergent. Shake the container frequently and when the seeds appear clean strain away the water, rinse the seeds and place them on a paper towel to dry.
Bromeliad seeds do not keep long. Depending on their family and storage methods they will only be viable from 4 weeks to 3 months. The Tillandsioideae family are the shortest lived seeds lasting at best 6 weeks. Seeds from the Bromelioideae and Pitcairnioideae families will last longer up to 3 months. Proper storage techniques will lengthen the viability of the seeds. Storing the seeds in paper containers or envelopes in the lowest possible humidity will help them keep longer. To avoid letting the seeds go bad plant, them as soon as possible.
If you prefer not to harvest your own seeds, they can be purchased from a professional grower. The Bromeliad Society International also has a seed exchange. Seeds can be an interesting way to try new varieties and cultivars. If you become very skilled and growing bromeliad from seeds you can begin to experiment with crossing varieties or cultivating plants that are shorter, taller or more brightly colored.
Germination
To germinate your seeds you can use soda bottles or disposable food containers. You will need to poke several drainage holes in the containers. A hot nail will work well for this. To use a soda bottle cut out the middle few inches but keep the top and the bottom. Make sure that food containers have lids and are primarily clear as light must pass through. Be sure to wash any containers used with hot water and mild dish detergent. Be sure to rinse the container well.
It is important to use a soilless potting medium. The potting medium should be able to retain moisture well. A mixture of half peat moss and half vermiculite is recommended . Orchid mixes will also work well. Bromeliads often prefer their growing medium slightly acidic. Sphagnum peat moss should provide some acidity. Any soilless mixture should work as long as it is sterile.
This method for seed germination is not recommended for Tillandsias.
Avoiding Problems
Because a warm, moist growing environment is required, the growing medium can be very susceptible to fungus. To avoid this you can apply a fungicide to the mix. You can also sprinkle finely ground peat moss over the top of the potting medium before planting the seeds. This will prevent dampening off. Dampening off occurs when a seedling is attacked by fungus shortly after germination. This is the most difficult obstacle to avoid and will kill seedlings before they have a chance to grow. At the first sign of mold or fungus, you should remove the lid from your container and placing the seedlings in direct sun for no more than 1 hour. Then replace the cover. This should kill the fungus without damaging the plants.
Sewing the Seeds
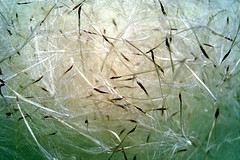
-Tillandsia seeds
To start your seed, pre-wet the potting medium so that it is thoroughly damp, but not dripping. If you need to, squeeze out excess moisture. Fill your chosen container about half way to the top. Make sure the top surface is level. If you dried seeds on a paper towel you can cut the paper towel to the size of the container or you can sprinkle the seeds directly on top of the potting medium. It is very important that you do not cover or bury the seeds with soil mix. Once your seeds are in place you can cover the container with the lid if there is one available or you can use plastic wrap secured tightly with a rubber band.
The cover will allow light through, but retain the moisture similar to a miniature terrarium. Make sure you place the containers in an area the will receive bright, indirect light, but never full sun. Direct sunlight could burn or scorch the seedlings. Maintain high humidity with the assistance of a humidifier if necessary. Ideal temperatures for germination and growth are between 70 and 80 degrees Fahrenheit. In the proper conditions, it should take about two weeks for the seeds to germinate in some cases it may take a bit longer. Keep an eye on the container and if you notice the potting medium becoming dry, place the container in a bowl of water and allow it to soak up water through the holes. Lift the container and allow any excess to drain out. Never water from the top as this could damage or move the tiny seedlings. Once the seedlings have sprouted you can remove the cover and check on them, but continue to keep them covered as often as possible until the seedlings have 2 or 3 leaves. When you are confident the bromeliads are healthy and growing you can begin hardening off the seedlings. Hardening off means gradually exposing them to more open air and some direct light. The process from germination to transplanting can take several months.
Transplanting
When the plants can handle exposure to air, variation in temperature and appear to be healthy and growing they can be transplanted into their individual pots. Some seedlings may reach this stage before others and you may want to transplant a few and keep the smaller specimen in the container awhile longer. Keep in mind that, depending on the variety, it can take up to 3 years for a bromeliad to reach maturity and produce a flower.
With some patience and the proper growing environment, you can have many bromeliads in your collection that were nursed from seeds. You will also undoubtedly have extras to share with friends and neighbors. Once planted the seedlings require little care beyond providing consistent temperature and moisture. If you are a bromeliad lover and ready for a new challenge, raising seeds will be the perfect experiment for you.
Sources
Atlee, John. “Bromeliads from Seed.” Bromeliad Society International. <http://www.bsi.org/brom_info/growing/seed-ja.html>
Ladd, Allan. “Raising Bromeliads from Seed.” <http://www.gcsbs.org.au/suppliers/al/bsr.pdf>
Head Odean. “Bromeliads from Seed.” Bromeliad Society International. <http://www.bsi.org/brom_info/growing/seed-oh.html>
“Bromeliad Seeds” Bromeliad Plants. <http://www.gcsbs.org.au/suppliers/al/bsr.pdf>
Bromeliad seed pods photo credit: Edu via http://www.flickr.com/photos/eutima/2930903400/
Tillandsia seed photo credit: Edu via http://www.flickr.com/photos/eutima/3022907176/
If you enjoyed this, please share it!


6 Responses to “Starting Bromeliads from Seed”
Leave a Reply
Resource Download
Hechtia Care Cheat Sheet
Learn how to care for your Hechtia bromeliad with this quick and easy informational guide.
Learn More
Ask an Expert
Questions about bromeliads?
Our experts love a challenge!
Monique
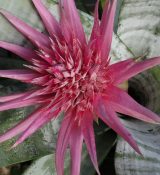
Bromeliad Aechmea
Photo of the Week
Submit your photo to be featured on the blog!
More Photo of the Week Winners
Submit Photo
How do you cross varieties? Creating hybrids etc?
You havto have two broms from the same family flowering at the same time obviously.,the apple and bag thick can work well for that. Then it’s as easy as isolating the two plants from and use a little brush or a chewed up toothpick or whatever to gently rattle inside each flower in turn. Wait until the flowers are looking real sad to give the seed time mature then have a go with the method described above.
Thanks for your info. I am retired and I love bromeliad. I have a bromeliads garden and they bloom all the time I love them. One of my plants produce a bunch of seeds so I cut them and I am going to try to produce them, Wish me luck
Chila
I brought these For my nan as a indoor plant are they good outside?
What climate do you live in and what kind of bromeliads did you buy?
Can bromeraid seed do well in Africa and Uganda in particular ?
Do have a special propagation case for bromeriads ?